This is a brief explanation of how to use Terraform to setup an AWS CVPN (Client VPN) where the certificates (for VPN authentication) are manually provisioned by yourself and then uploaded into ACM (AWS Certificate Manager).
The advantage of using a manually provisioned approach is that the cost is significantly lower than a managed approach that utilises AWS Private CA (Certificate Authority). Previously, the cost of operating AWS Private CA for us was $800 / Month. Apart from the initial manual steps required to generate the certificate chain, the main disadvantages of this approach over a fully managed approach are that: (1) you also have to store your certificates and keys outside of the cloud in a secure location, and (2) you have to remember to renew certificates before they expire and then replace the expiring certificates with their newer counterparts in ACM.
If you are looking for a fully managed approach instead, you can find this in a previous blog article that I wrote - AWS Client VPN with Managed Certificates using Terraform.
The approach taken in this article was informed by the Timeular blog post: Creating an AWS Client VPN with Terraform. Unfortunately, I could not get their approach to work correctly, and so the approach detailed in my article is an adaption/extension of their approach, but I want to thank them as my work builds upon theirs.
Chain of Trust
We will create a number of certificates that will form a chain of trust. Each subordinate certificate is signed by its parent certificate. Our chain of trust will look like:
- Root CA Certificate.
- Intermediate CA Certificate - this CA certificate is used as an intermediary between the Root CA and our other CAs. This makes it easier to revoke subordinate CA certificates should we need to. This certificate is signed by the Root CA Certificate.
- CVPN CA Certificate - this CA certificate is used for issuing and signing certificates that are used by the CVPN Server and its clients (e.g. users) to connect to the CVPN Server. This certificate is signed by the Intermediate CA Certificate.
- CVPN Server Certificate - this endpoint certificate is for the CVPN server itself in AWS. This certificate is signed by the CVPN CA Certificate.
- CVPN Client Certificate - we create one of these endpoint certificates for each client (e.g. user) that wishes to connect to the CPVN Server. These certificates will also be signed by the CVPN CA Certificate.
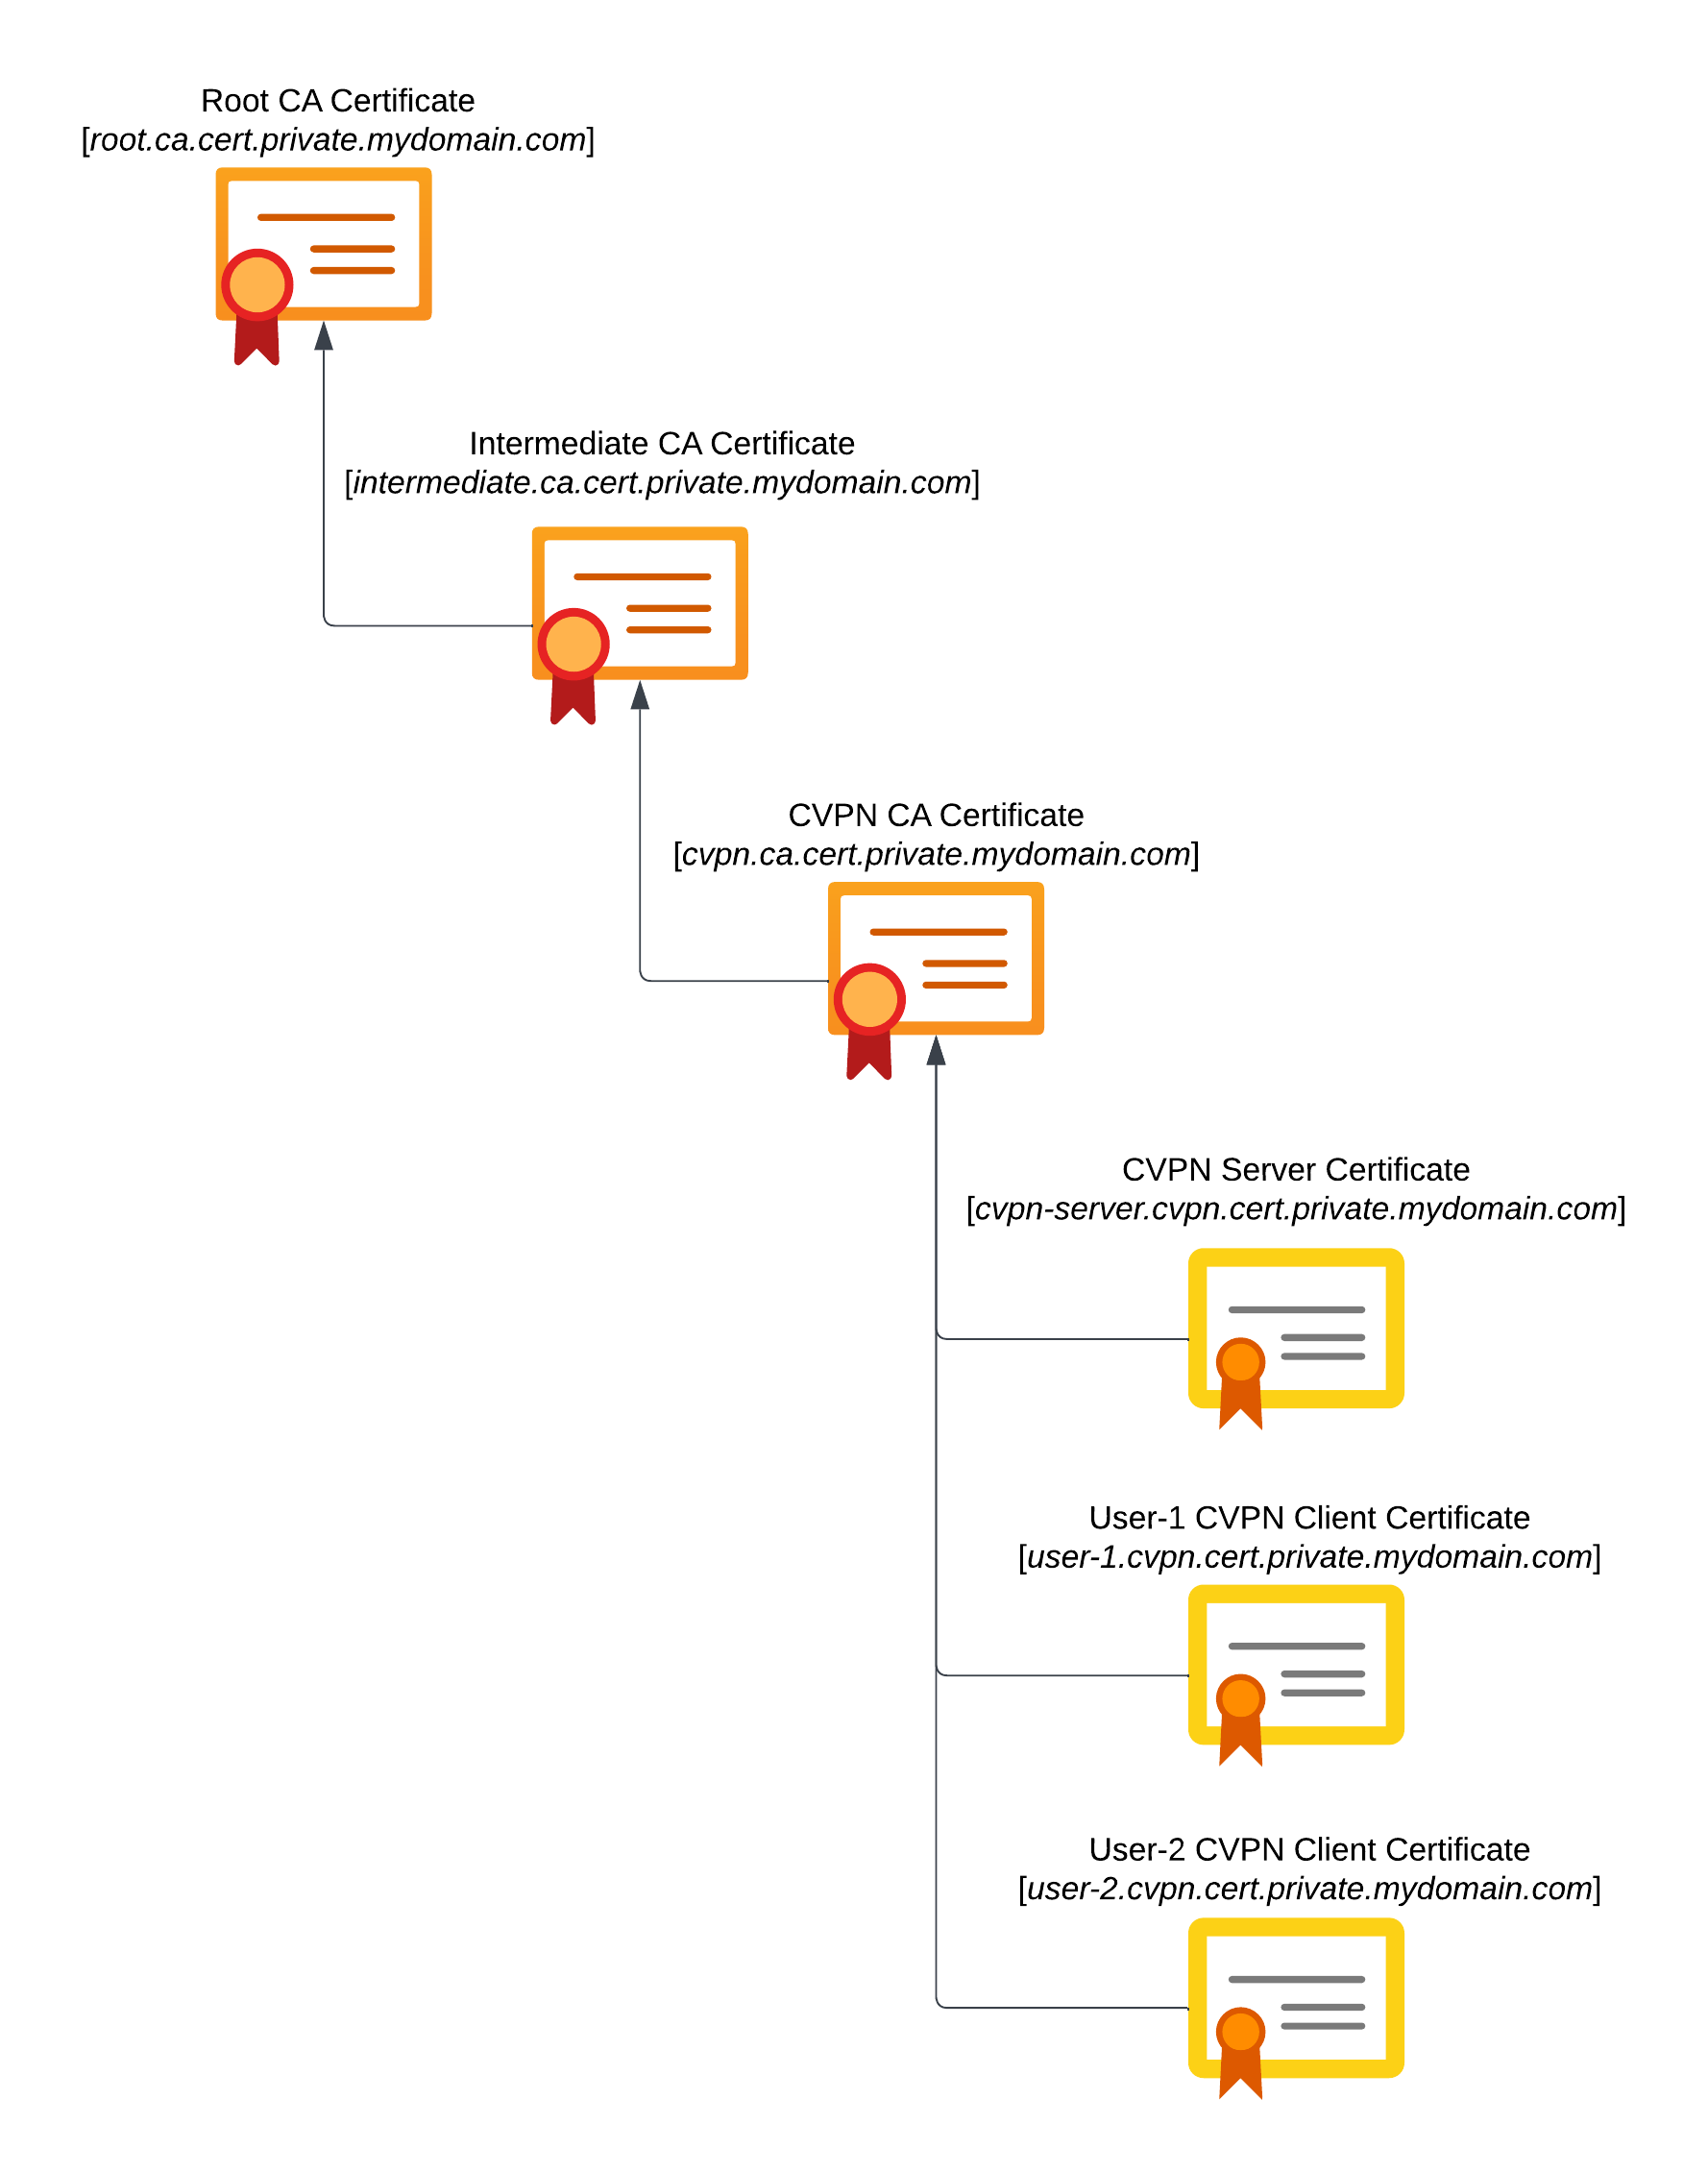
The purpose of having a separate Root CA, Intermediate CA, and CVPN CA is that we have delegated trust from the Root to the CVPN via the Intermediate. We can therefore easily isolate the CVPN if needed and manage CVPN certificate issuance and revocation completely separately to the Root. In future it may be desirable to create further delegated CAs from the Intermediate CA for other purposes.
Creating the Certificates
We will manually create all of the CA certificates and endpoint certificates. Whilst various tools are available for this purpose, for convenience, the first time I undertook this I used the GUI tool XCA (which is available for macOS, Linux, and Windows). In this article I will show both the settings required for XCA, and also provide the equivalent OpenSSL commands. After the Certificates are generated we will deploy them and the Client VPN with Terraform further below.
Note: For the OpenSSL commands, I tested against OpenSSL version 3.0.11.
Root CA
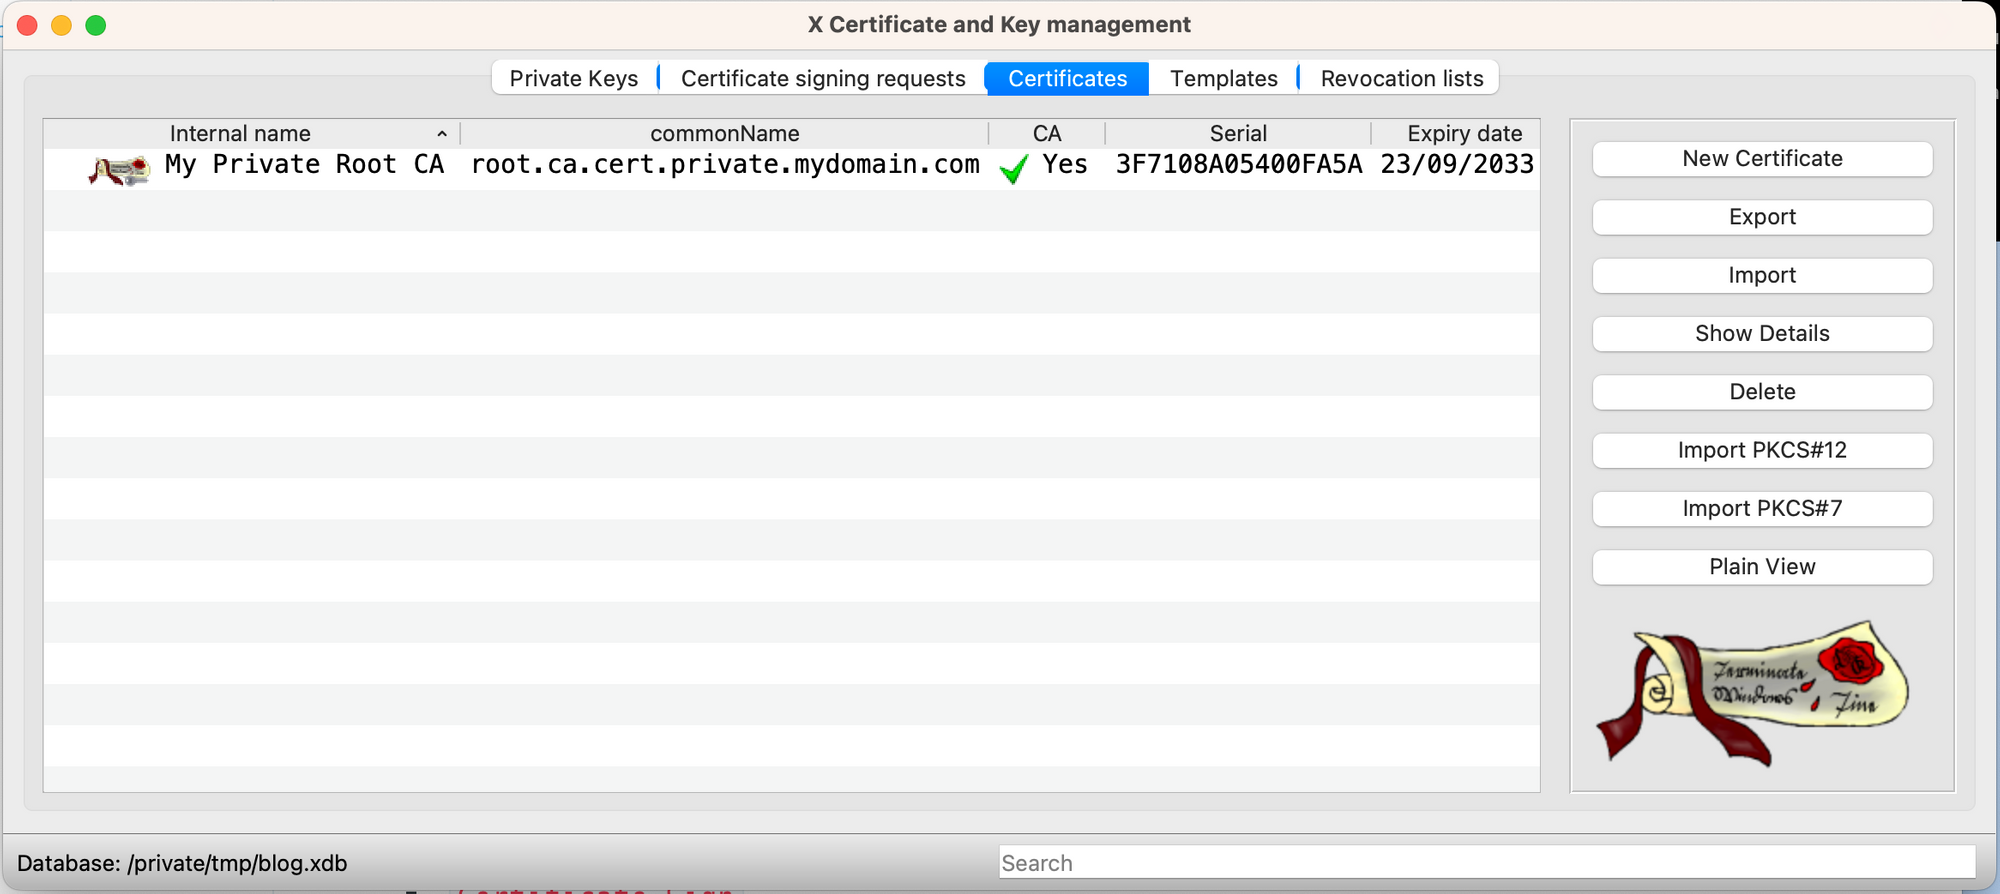
In XCA you need to navigate to the Certificates tab, and then press the New Certificate button. This presents a dialog with a number of tabs, that should be configured with the following information and settings, after which a new Root CA certificate will be created in the XCA database for you.
- Type:
x509 Certificate - Source:
- Signing: Create a self signed certificate
- Signature algorithm:
SHA 512 - Template for new certificate:
[default] Empty template
- Subject:
- Internal Name:
My Private Root CA - Distinguished Name:
- countryName:
GB - stateOrProvinceName:
My State - localityName:
My Locality - organizationName:
My Company - organizationalUnitName:
DevOps - commonName:
root.ca.cert.private.mydomain.com - emailAddress:
devops@mydomain.com
- countryName:
- Private Key:
- Name:
My Private Root CA - Type:
RSA - Size:
4096 bit
- Name:
- Internal Name:
- Extensions:
- x509v3 Basic Constraints:
- Type:
Certification Authority
- Type:
- Key Identifier:
x509v3 Subject Key Identifierx509v3 Authority Key Identifier
- Validity: (10 Years)
- Not Before:
2023-09-01 00:00 GMT - Not After:
2033-08-31 23:59 GMT
- Not Before:
- x509v3 Basic Constraints:
- Key usage:
- x509v3 Key Usage:
Certificate SignCRL Sign
- x509v3 Key Usage:
If you prefer to generate the Root CA with OpenSSL then you can use the following commands:
cat << EOF > openssl.conf
default_ca = my_ca

[ my_ca ]
unique_subject = yes
database = openssl.index.txt
serial = openssl.serial
default_md = sha1
default_crl_days = 730

[ req_ca ]
x509_extensions = v3_ca

[ v3_ca ]
basicConstraints = CA:TRUE
subjectKeyIdentifier=hash
authorityKeyIdentifier=keyid
keyUsage=Certificate Sign, CRL Sign

[ req_tls_server ]
x509_extensions = v3_tls_server

[ v3_tls_server ]
basicConstraints = CA:FALSE
subjectKeyIdentifier=hash
authorityKeyIdentifier=keyid
keyUsage=Digital Signature
extendedKeyUsage=TLS Web Server Authentication

[ req_tls_client ]
x509_extensions = v3_tls_client

[ v3_tls_client ]
basicConstraints = CA:FALSE
subjectKeyIdentifier=hash
authorityKeyIdentifier=keyid
keyUsage=Digital Signature
extendedKeyUsage=TLS Web Client Authentication
EOF

openssl genrsa -out root.ca.private.key.pem 4096

openssl req -new -x509 -config openssl.conf -section req_ca -sha512 \
    -subj "/C=GB/ST=My State/L=My Locality/O=My Company/OU=DevOps/CN=root.ca.cert.private.mydomain.com/emailAddress=devops@mycompany.com" \
-days 3650 -set_serial 0x1 -key root.ca.private.key.pem -out root.ca.crt.pemIntermediate CA
To generate the subordinate Intermediate CA in XCA you need to make sure you have the My Private Root CA certificate selected in the Certificates tab, and then press the New Certificate button. This presents a dialog with a number of tabs, that should be configured with the following information and settings, after which a new Intermediate CA certificate will be created (as a subordinate of the Root CA) in the XCA database for you.
- Type:
x509 Certificate - Source:
- Signing:
My Private Root CA - Signature algorithm:
SHA 512 - Template for new certificate:
[default] Empty template
- Signing:
- Subject:
- Internal Name:
My Private Intermediate CA - Distinguished Name:
- countryName:
GB - stateOrProvinceName:
My State - localityName:
My Locality - organizationName:
My Company - organizationalUnitName:
DevOps - commonName:
intermediate.ca.cert.private.mydomain.com - emailAddress:
devops@mydomain.com
- countryName:
- Private Key:
- Name:
My Private Intermediate CA - Type:
RSA - Size:
4096 bit
- Name:
- Internal Name:
- Extensions:
- x509v3 Basic Constraints:
- Type:
Certification Authority
- Type:
- Key Identifier:
x509v3 Subject Key Identifierx509v3 Authority Key Identifier
- Validity: (5 Years)
- Not Before:
2023-09-01 00:00 GMT - Not After:
2028-08-31 23:59 GMT
- Not Before:
- x509v3 Basic Constraints:
- Key usage:
- x509v3 Key Usage:
Certificate SignCRL Sign
- x509v3 Key Usage:

If you prefer to generate the Intermediate CA with OpenSSL then you can use the following commands:
openssl genrsa -out intermediate.ca.private.key.pem 4096

openssl req -new -config openssl.conf -section req_ca -sha512 \
    -subj "/C=GB/ST=My State/L=My Locality/O=My Company/OU=DevOps/CN=intermediate.ca.cert.private.mydomain.com/emailAddress=devops@mycompany.com" \
    -key intermediate.ca.private.key.pem -out intermediate.ca.csr.pem

openssl req -x509 -config openssl.conf -section req_ca -sha512 \
    -CA root.ca.crt.pem -CAkey root.ca.private.key.pem \
-days 1825 -set_serial 0x2 -in intermediate.ca.csr.pem -key intermediate.ca.private.key.pem -out intermediate.ca.crt.pemCVPN CA
To generate the subordinate CVPN CA in XCA you need to make sure you have the My Private Intermediate CA certificate selected in the Certificates tab, and then press the New Certificate button. This presents a dialog with a number of tabs, that should be configured with the following information and settings, after which a new CVPN CA certificate will be created (as a subordinate of the Intermediate CA) in the XCA database for you.
- Type:
x509 Certificate - Source:
- Signing:
My Private Intermediate CA - Signature algorithm:
SHA 512 - Template for new certificate:
[default] Empty template
- Signing:
- Subject:
- Internal Name:
My Private CVPN CA - Distinguished Name:
- countryName:
GB - stateOrProvinceName:
My State - localityName:
My Locality - organizationName:
My Company - organizationalUnitName:
DevOps - commonName:
cvpn.ca.cert.private.mydomain.com - emailAddress:
devops@mydomain.com
- countryName:
- Private Key:
- Name:
My Private CVPN CA - Type:
RSA - Size:
2048 bit
- Name:
- Internal Name:
- Extensions:
- x509v3 Basic Constraints:
- Type:
Certification Authority
- Type:
- Key Identifier:
x509v3 Subject Key Identifierx509v3 Authority Key Identifier
- Validity: (3 Years)
- Not Before:
2023-09-01 00:00 GMT - Not After:
2026-08-31 23:59 GMT
- Not Before:
- x509v3 Basic Constraints:
- Key usage:
- x509v3 Key Usage:
Certificate SignCRL Sign
- x509v3 Key Usage:
Note that for the CVPN CA, the Private Key size is only 2048 bits and not 4096 bits (as used by the Root and Intermediate CA); this is due to a limitation with the AWS Client VPN only supporting a maximum key size of 2048 bits.

If you prefer to generate the CVPN CA with OpenSSL then you can use the following commands:
openssl genrsa -out cvpn.ca.private.key.pem 2048

openssl req -new -config openssl.conf -section req_ca -sha512 \
    -subj "/C=GB/ST=My State/L=My Locality/O=My Company/OU=DevOps/CN=cvpn.ca.cert.private.mydomain.com/emailAddress=devops@mycompany.com" \
    -key cvpn.ca.private.key.pem -out cvpn.ca.csr.pem

openssl req -x509 -config openssl.conf -section req_ca -sha512 \
    -CA intermediate.ca.crt.pem -CAkey intermediate.ca.private.key.pem \
    -days 1095 -set_serial 0x3 -in cvpn.ca.csr.pem -key cvpn.ca.private.key.pem -out cvpn.ca.crt.pem

cat root.ca.crt.pem intermediate.ca.crt.pem > cvpn.ca.crt.chain.pemCVPN Server Certificate
To generate the endpoint CVPN Server certificate in XCA you need to make sure you have the My Private CVPN CA certificate selected in the Certificates tab, and then press the New Certificate button. This presents a dialog with a number of tabs, that should be configured with the following information and settings, after which a new CVPN Server certificate will be created (as a subordinate of the CVPN CA) in the XCA database for you.
- Type:
x509 Certificate - Source:
- Signing:
My Private CVPN CA - Signature algorithm:
SHA 512 - Template for new certificate:
[default] Empty template
- Signing:
- Subject:
- Internal Name:
My Private CVPN - Server - Distinguished Name:
- countryName:
GB - stateOrProvinceName:
My State - localityName:
My Locality - organizationName:
My Company - organizationalUnitName:
DevOps - commonName:
cvpn-server.cvpn.cert.private.mydomain.com - emailAddress:
devops@mydomain.com
- countryName:
- Private Key:
- Name:
My Private CVPN - Server - Type:
RSA - Size:
2048 bit
- Name:
- Internal Name:
- Extensions:
- x509v3 Basic Constraints:
- Type:
End Entity
- Type:
- Key Identifier:
x509v3 Subject Key Identifierx509v3 Authority Key Identifier
- Validity: (3 Years)
- Not Before:
2023-09-01 00:00 GMT - Not After:
2026-08-31 23:59 GMT
- Not Before:
- x509v3 Basic Constraints:
- Key usage:
- x509v3 Key Usage:
Digital Signature
- x509v3 Extended Key Usage:
TLS Web Server Authentication
- x509v3 Key Usage:

If you prefer to generate the CVPN Server certificate with OpenSSL then you can use the following commands:
openssl genrsa -out cvpn-server.private.key.pem 2048

openssl req -new -config openssl.conf -section req_tls_server -sha512 \
    -subj "/C=GB/ST=My State/L=My Locality/O=My Company/OU=DevOps/CN=cvpn-server.cvpn.cert.private.mydomain.com/emailAddress=devops@mycompany.com" \
    -key cvpn-server.private.key.pem -out cvpn-server.csr.pem

openssl req -x509 -config openssl.conf -section req_tls_server -sha512 \
    -CA cvpn.ca.crt.pem -CAkey cvpn.ca.private.key.pem \
    -days 1095 -set_serial 0x4 -in cvpn-server.csr.pem -key cvpn-server.private.key.pem -out cvpn-server.crt.pem

cat root.ca.crt.pem intermediate.ca.crt.pem cvpn.ca.crt.pem > cvpn-server.crt.chain.pemCVPN Client Certificate(s)
To generate the endpoint CVPN Client certificate(s) that will enable a client (e.g. user) to connect to the CVPN Server, you may use the following as a template and repeat it for as many clients as you need; just replace <<username>> with the username of the user, etc.
In XCA you need to make sure you have the My Private CVPN CA certificate selected in the Certificates tab, and then press the New Certificate button. This presents a dialog with a number of tabs, that should be configured with the following information and settings, after which a new CVPN Client certificate will be created (as a subordinate of the CVPN CA) in the XCA database for you.
- Type:
x509 Certificate - Source:
- Signing:
My Private CVPN CA - Signature algorithm:
SHA 512 - Template for new certificate:
[default] Empty template
- Signing:
- Subject:
- Internal Name:
My Private CVPN - User - <<username>> - Distinguished Name:
- countryName:
<<countryCode>> - stateOrProvinceName:
<<county>> - localityName:
<<city>> - organizationName:
<<organisation>> - organizationalUnitName:
<<department>> - commonName:
<<username>>.cvpn.cert.private.mydomain.com - emailAddress:
<<email>>
- countryName:
- Private Key:
- Name:
My Private CVPN - User - <<username>> - Type:
RSA - Size:
2048 bit
- Name:
- Internal Name:
- Extensions:
- x509v3 Basic Constraints:
- Type:
End Entity
- Type:
- Key Identifier:
x509v3 Subject Key Identifierx509v3 Authority Key Identifier
- Validity: (1 Year)
- Not Before:
2023-09-01 00:00 GMT - Not After:
2024-08-31 23:59 GMT
- Not Before:
- x509v3 Basic Constraints:
- Key usage:
- x509v3 Key Usage:
Digital Signature
- x509v3 Extended Key Usage:
TLS Web Client Authentication
- x509v3 Key Usage:

aretter visible in XCAIf you prefer to generate the CVPN Client certificate for the user with OpenSSL then you can use the following commands:
export CVPN_USERNAME=aretter

openssl genrsa -out $CVPN_USERNAME.private.key.pem 2048

openssl req -new -config openssl.conf -section req_tls_client -sha512 \
    -subj "/C=GB/ST=My State/L=My Locality/O=My Company/OU=DevOps/CN=$CVPN_USERNAME.cvpn.cert.private.mydomain.com/emailAddress=$CVPN_USERNAME@mycompany.com" \
    -key $CVPN_USERNAME.private.key.pem -out $CVPN_USERNAME.csr.pem

openssl req -x509 -config openssl.conf -section req_tls_client -sha512 \
    -CA cvpn.ca.crt.pem -CAkey cvpn.ca.private.key.pem \
-days 365 -set_serial 0x5 -in $CVPN_USERNAME.csr.pem -key $CVPN_USERNAME.private.key.pem -out $CVPN_USERNAME.crt.pemDeploying the Certificates in Terraform
Now that we have generated CA certificates and endpoint certificates, we can now deploy them to ACM (AWS Certificate Manager) by using Terraform.
# Deploy the Client VPN CA
data "local_sensitive_file" "my_private_cvpn_ca_private_key" {
  filename = ("cvpn.ca.private.key.pem")
}

data "tls_certificate" "my_private_cvpn_ca_certificate" {
  content = file("cvpn.ca.private.crt.pem")
}

data "tls_certificate" "my_private_cvpn_ca_chain_certificate" {
  content = file("cvpn.ca.private.crt.chain.pem")
}

resource "aws_acm_certificate" "my_private_cvpn_ca_certificate" {
  private_key       = data.local_sensitive_file.my_private_cvpn_ca_private_key.content
  certificate_body  = data.tls_certificate.my_private_cvpn_ca_certificate.content
  certificate_chain = data.tls_certificate.my_private_cvpn_ca_chain_certificate.content

  lifecycle {
    create_before_destroy = true
  }

  tags = {
    Environment = "cvpn"
  }
}


# Deploy the Client VPN Server certificate
data "local_sensitive_file" "my_private_cvpn_server_private_key" {
  filename = ("cvpn-server.private.key.pem")
}

data "tls_certificate" "my_private_cvpn_server_certificate" {
  content = file("cvpn-server.crt.pem")
}

data "tls_certificate" "my_private_cvpn_server_chain_certificate" {
  content = file("cvpn-server.crt.chain.pem")
}

resource "aws_acm_certificate" "my_private_cvpn_server_certificate" {
  private_key       = data.local_sensitive_file.my_private_cvpn_server_private_key.content
  certificate_body  = data.tls_certificate.my_private_cvpn_server_certificate.content
  certificate_chain = data.tls_certificate.my_private_cvpn_server_chain_certificate.content

  lifecycle {
    create_before_destroy = true
  }

  tags = {
    Environment = "cvpn"
  }
}Note that as the client (e.g. user) certificates are signed by the CVPN CA (i.e. the same CA as used by the Client VPN and the Client VPN Server certificate), they do not need to be uploaded into AWS ACM.
Creating the Client VPN in Terraform
Now that we have the CA certificates and endpoint certificates in place, we can create and configure the AWS Client VPN by using Terraform.
resource "aws_ec2_client_vpn_endpoint" "cvpn" {
  description = "Client VPN"

  vpc_id = <YOUR VPC ID>

  client_cidr_block = "192.168.68.0/22"
  split_tunnel      = true

  server_certificate_arn = aws_acm_certificate.my_private_cvpn_server_certificate.arn

  authentication_options {
    type                       = "certificate-authentication"
    root_certificate_chain_arn = aws_acm_certificate.my_private_cvpn_ca_certificate.arn
  }

  self_service_portal = "disabled"

  security_group_ids = [
    module.cvpn_access_security_group.security_group_id
  ]

  tags = {
    Name        = "cvpn_endpoint"
    Environment = "cvpn"
  }
}

resource "aws_ec2_client_vpn_network_association" "cvpn" {
  count = 1

  client_vpn_endpoint_id = aws_ec2_client_vpn_endpoint.cvpn.id
  subnet_id              = <ID OF YOUR IPv4 SUBNET WHERE THE CLIENT VPN WILL TERMINATE>

  lifecycle {
    // The issue why we are ignoring changes is that on every change
    // terraform screws up most of the cvpn assosciations
    // see: https://github.com/hashicorp/terraform-provider-aws/issues/14717
    ignore_changes = [subnet_id]
  }
}

resource "aws_ec2_client_vpn_authorization_rule" "cvpn_auth" {
  client_vpn_endpoint_id = aws_ec2_client_vpn_endpoint.cvpn.id
  target_network_cidr    = <YOUR IPv4 SUBNET WHERE THE CLIENT VPN WILL TERMINATE>
  authorize_all_groups   = true
}


module "cvpn_access_security_group" {
  source  = "terraform-aws-modules/security-group/aws"
  version = "4.17.2"

  name        = "cvpn_access_security_group"
  description = "Security group for CVPN Access"

  vpc_id = <YOUR VPC ID>

  computed_ingress_with_cidr_blocks = [
    {
      description = "VPN TLS"
      from_port   = 443
      to_port     = 443
      protocol    = "udp"
      cidr_blocks = <YOUR IPv4 SUBNET WHERE THE CLIENT VPN WILL TERMINATE>
    }
  ]
  number_of_computed_ingress_with_cidr_blocks = 1

  computed_ingress_with_ipv6_cidr_blocks = [
    {
      description      = "VPN TLS (IPv6)"
      from_port        = 443
      to_port          = 443
      protocol         = "udp"
      ipv6_cidr_blocks = <YOUR IPv6 SUBNET WHERE THE CLIENT VPN WILL TERMINATE>
    }
  ]
  number_of_computed_ingress_with_ipv6_cidr_blocks = 1

  egress_with_cidr_blocks = [
    {
      description = "All"
      from_port   = -1
      to_port     = -1
      protocol    = -1
      cidr_blocks = "0.0.0.0/0"
    }
  ]

  egress_with_ipv6_cidr_blocks = [
    {
      description = "All (IPv6)"
      from_port   = -1
      to_port     = -1
      protocol    = -1
      cidr_blocks = "2001:db8::/64"
    }
  ]

  tags = {
    Name        = "sg_cvpn"
    Type        = "security_group"
    Environment = "cvpn"
  }
}The following placeholders in the code above need to be filled out with your own Terraform AWS configuration values:
<YOUR VPC ID>- the AWS ID of your VPC in which you wish to deploy the Client VPN.<ID OF YOUR IPv4 SUBNET WHERE THE CLIENT VPN WILL TERMINATE>- the AWS ID of the IPv4 Subnet within your VPC where you wish VPN traffic to arrive to.<YOUR IPv4 SUBNET WHERE THE CLIENT VPN WILL TERMINATE>- the IPv4 Subnet CIDR address within your VPC where you wish VPN traffic to arrive to.<YOUR IPv6 SUBNET WHERE THE CLIENT VPN WILL TERMINATE>- the IPv6 Subnet CIDR address within your VPC where you wish VPN traffic to arrive to.
Connecting to the Client VPN
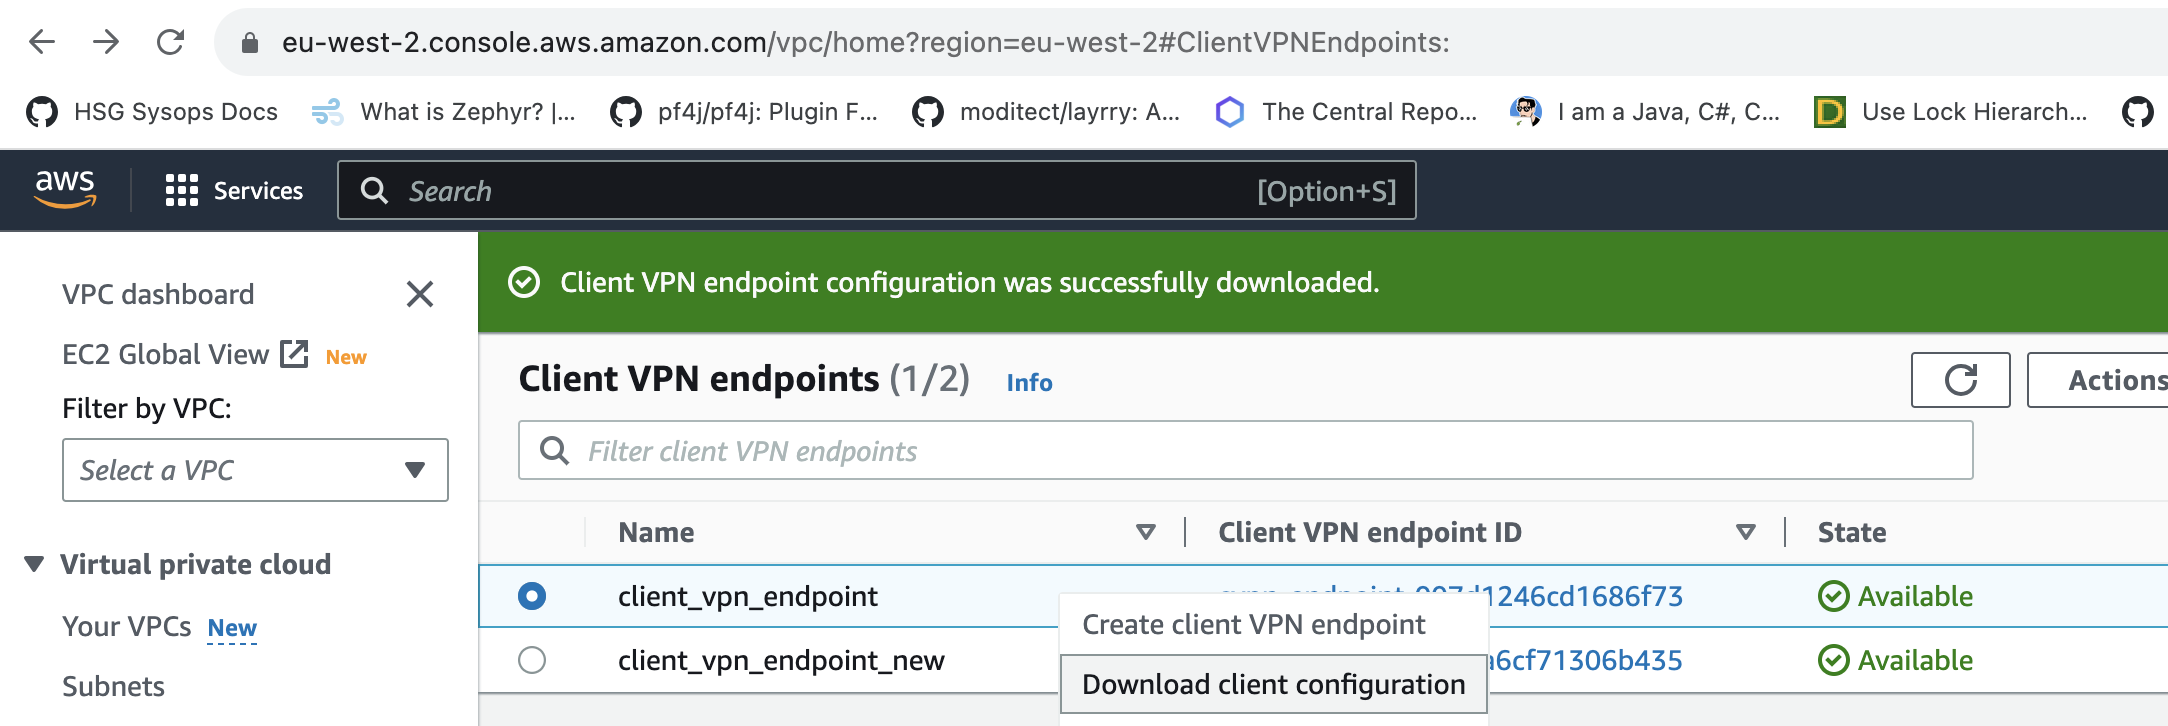
Once you have the above setup you can download a skeleton OpenVPN configuration file from the AWS Dashboard.
The OpenVPN configuration file provided by AWS will be incomplete, and will something look like this:
client
dev tun
proto udp
remote cvpn-endpoint-006d2181ae8616b54.prod.clientvpn.eu-west-2.amazonaws.com 443
remote-random-hostname
resolv-retry infinite
nobind
remote-cert-tls server
cipher AES-256-GCM
verb 3
<ca>
-----BEGIN CERTIFICATE-----
SECRET STUFF HERE ;-)
-----END CERTIFICATE-----

</ca>


reneg-sec 0

verify-x509-name cvpn-server.cvpn.cert.private.mydomain.com nameYou will need to modify it to add:
- A
<cert>section containing the certificate for one of the CVPN Client certificate(s) that you generated above with XCA or OpenSSL. - A
<key>section containing the private key for the CVPN Client certificate that you are using.
You should then have a complete OpenVPN configuration file that looks similar to this:
client
dev tun
proto udp
remote cvpn-endpoint-006d2181ae8616b54.prod.clientvpn.eu-west-2.amazonaws.com 443
remote-random-hostname
resolv-retry infinite
nobind
remote-cert-tls server
cipher AES-256-GCM
verb 3
<ca>
-----BEGIN CERTIFICATE-----
SECRET STUFF HERE ;-)
-----END CERTIFICATE-----

</ca>
<cert>
-----BEGIN CERTIFICATE-----
SECRET STUFF HERE ;-)
-----END CERTIFICATE-----

</cert>
<key>
-----BEGIN RSA PRIVATE KEY-----
SECRET STUFF HERE ;-)
-----END RSA PRIVATE KEY-----

</key>

reneg-sec 0

verify-x509-name cvpn-server.cvpn.cert.private.mydomain.com nameYou may now use your favourite OpenVPN client tool, with the above OpenVPN configuration file to connect to your new Client VPN; I personally use Tunnelblick. Enjoy!